Getting Started
Contents of this Post
SEO is a never-ending game between you and search engines. Whether you are a beginner or an intermediate or experienced marketer, your SEO knowledge needs to be updated because SEO techniques that worked well in the past are outdated today!
It doesn’t matter if you are creating a new website or updating your old one, these few DIY SEO tips will go a long way in ensuring that your website gets noticed by the Search Engines out there as well as appreciated by your viewers.
Niche Selection
Here is where you start – getting into the right niche will determine whether you are going to be successful or not. As an Entrepreneur, finding the right niche is about as important as remembering to take your fishing rod when you go fishing! If you forget that, you won’t get very far.
Broad Niches and Narrow or Sub Niches
And it’s not enough that you decide on your ‘overall’ or ‘broad’ niche. Niches that are too broad will be very difficult to penetrate. Take for example, that you wanted to get into the weight loss niche. That’s such a broad term. Search for weight loss on Google and you get 20,600,000 results for it!

That’s just 206 million sites you have to compete with to get to the 1st page of Google for this niche!!
In comparison, let’s take “weight loss after pregnancy” and you find that now you are going to complete with 25 million sites!

Let’s drill down a little more! Shall we try “lose belly fat after pregnancy”? nd guess what? Now you have just 1.9 million sites to compete with!!

Can you see what’s happening here?
The broader your niche is going to be, the more competition you will have. When you start narrowing your niche and get into sub niches and sub sub niches, you will have a fighting chance with your site.
So that’s exactly what you need to do when selecting your Niche. Put down your main general niche that you’ve chosen. Then try drilling down to the maximum sub niches you can and choose one of those to start with.
But where does one start to find the broad niche?
Well, there are plenty of places to find a good niche. Keep in mind some of these pointers when selecting your broad niche and you will be good to go
- There’s a good amount of demand for the product – unless there are enough people willing to buy your product, there’s no point selling it is there? If you’re going to try and sell snow boots in sunny California, you’re not going to get many takers are you?
- You are interested in the niche or are willing to learn about it – if the topic doesn’t interest you even a little, stay away from it, as your lack of passion will come through in your content.
- There are lots of sub-niches within the broad niche – this will ensure that you are able to get deep into your niche vertical and never want for products to sell
- There are plenty of related products in that niche – again this will ensure that your business is scalable with plenty of content ideas that are related to your main niche
- Try to choose an evergreen niche – be careful that the huge demand you find for your niche is not a seasonal trend, as that will crush your sales off season
Evergreen Niches
If you’re completely at a loss at where to start, here are some broad evergreen Niches that have stood the test of time. Start with one of these
 Health – Weight loss, Fitness
- Wealth – Make money, Insurance, Stocks
- Spiritual – Self Motivation
- Sports & Hobbies – Fishing, Guitar
- Gaming – PC, Mobile, xBox
- Relationships – Dating
- Education – Training, Courses
The topic “Choosing the Right Niche” is such a huge and vast subject that one can write a complete book only on this.
Let me know if you want to know more on this, and if many of you request it, I can write my next report on this!
Keyword Research
When you are planning your content strategy, it makes sense to focus on keywords that people are actually searching for, instead of filling up your blog with something no one is looking for.
Search engines are built to bring up the most relevant content users are typing in the search boxes. So, if you have optimized your content for those most searched for keywords in your niche, then you are going to show up on tops. Simple. If you start out with a planned approach right at the start, you will have a clear idea how to structure your content and save valuable time later.
Keyword Research will not only get you more organized but will also give you invaluable insight into your competition. Depending on how good or bad your competition is, you will learn what to do and what NOT to do.
Effective Keyword Research
If you want to rank high, keyword research is the foundation. There is no good in ranking high for wrong keywords.
You have to understand your target audience, find the right keywords and do something more than your competitors – to rank high in your niche.
Defining target audience
Start with understanding your product or service. Be clear with the purpose of your website. If you are going to sell something, think about who will be buying from you.
Digital marketers and bloggers create a persona to understand their target audience. It is not just saying like all women are going to be your fashion blog. It should be well-defined like age, sex, location, language etc.

If you can’t define your audience, how you can identify them, reach them and sell them?
Here is an article from Hubspot that shows you how you can define a buyer persona in 100 words.
Finding the right keywords
Keywords are the search terms used by readers / buyers to find what they are looking for in search engines.
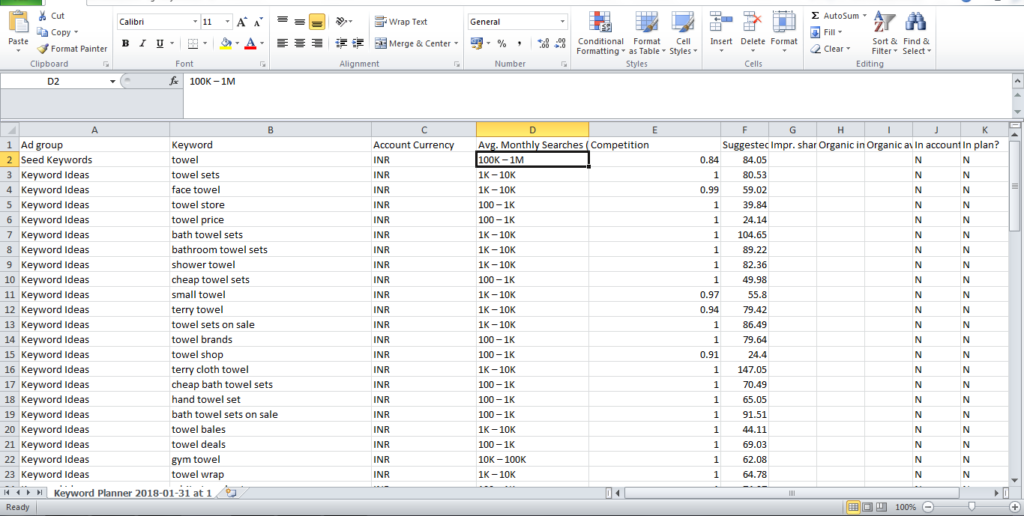
Screenshot of keyword planner results with search volume, competition and keywords.
I recommend using Google’s keyword planner tool to find the keywords.
This tool allows you to find related keywords, their search volume and the competition. This tool is meant for search engine marketers to find the bid range and create their search engine PPC ads.
But you can also use this tool to get keywords for your website.
Keywords should:
- Have a decent search volume at least 1k to 10k per month
- Have less competition
- Have moderate to high bid range (for Google Adwords)
Go to google’s keyword planner and type your niche.
Then adjust the target location and choose the category of your keyword.
Once you get the results you can find all the keywords and their details like search volume, average bid range and competiton.
Export the results as CSV file so that you can open it using spreadsheets later.
Open the keywords file and filter them based on search volume.
Choose the keywords with 1K to 10K or more search volume and remove others.
Then sort them based on the competition. If the competition is 1, it means 100% competition. So you have to choose the ones with low competition.
Hurray!
You made it. Now you have the right keywords, your success rate in SEO should be much higher like never before.
There are quite a few tools available that will give you valuable insights into the kind of keywords you should be using for your content.
The most popular of course is the Google Keyword Planner, but there are many others like
- WordTracker
- Google Correlate
- Soovle
- SEMRUSH
- LongTailPro
- Ubersuggest
- Ahrefs (Offers 7 days trial for $7)
- KWFinder (Have free plan as well)
- SpyFU
- SERPStat
Competitor Analysis
Once you got the keywords, search for them in google.com or google in your target location like google.co.in or google.co.uk etc.

Get the list of top 10 results for every keyword.
Those are your competitors.
Omit the high-authority pages like Wikipedia or gov sites. You can’t compete with them as they have high domain-authority and traffic.
When you get the competitors, you have to analyse how they used that keyword and how many articles or search results they have.
Create a spreadsheet and note down the details.
This will be your guide in creating content strategy.
Get the Right domain name
Once you have finalized your niche, done your keyword research and decided what your website is going to be all about, it is time to get the right domain name.
Your domain name should be an easy one for people to remember and also to type out. A .com is the best preferred TLD (Top Level Domain) by search engines, especially Google

Here are some tips
- Keep it within 20 characters with the extension
- .com is still considered as the best
- Avoid using hyphens and numbers
- Get something brandable, Google loves brands
- Try to be unique
- Try to include your main keyword in the domain name
Make sure there is no other website with the same domain with different extension like .biz, .co, etc to avoid confusion
Winning Content Strategy
A website’s content should be well-planned. It is not about just publishing in regular schedule.
This chapter talks about how to create and schedule content effectively.

Corner stone content
Like how the corner stone plays a major role in constructing a building, corner stone content is for blogging.
A website should have thoroughly written articles about the important topics related to the niche.
If your niche is photography, then your website should have at least a few good corner stone content.
They should be thoroughly written, should act like a guide to the readers. There is no word limit for it, you can write in detail covering almost everything that a reader will look for.
These articles will be the foundation for your website’s traffic. You have to write supporting articles related to your corner stones for better inbound linking.
Here are examples for corner stone content and related supporting articles.
| Corner stone content | Supporting articles |
| How to start a garden in your backyard? | Backyard gardening – Effective tips from top gardeners |
| Beginners guide to SEO | Top 5 SEO mistakes that can affect your ecommerce store |
Different types of content
Just be honest.
Will you be reading blog articles all the time? Or look for podcasts?
Even you might be looking for a video than reading a long blog article.
These are the trending formats now.
People are busy with their lives, they don’t like to read for a long time and get bored of it.

Make sure you have different formats for your content including:
- Infographics
- Videos
- Podcasts
- Q & A
- How-to guides
- Tutorials
- Reviews
Pro Tip: You can use your corner stone content to create videos, podcasts, infographics and also for social media posts.
Content calendar
Content and SEO may get complicated. If you are posting on irregular intervals your audience will definitely lose interest. This will result in less traffic and bad SEO rankings.
Will you watch a TV series that doesn’t have a regular schedule? Sounds crazy right? The same applies to content marketing too.

Whatever may be your medium, whether it is a YouTube channel or a podcast or a blog post series – stick to a schedule!
I am busy with my other work, how can I do that?

Let me tell you a simple trick.
Create the content whenever you have time. Keep the finished content as drafts and schedule them. So you can even schedule next month’s content today!
Pro tip: Google calendar is the best tool for your content calendar. You can share it with your team mates or other writers and get the content ready on time.
Fine Tuning the Engine
This is where we are going to fine tune our website and get it ready to give us data that we can monitor to evaluate how the website is doing with both, human users, as well as the Search engine bots.
Google Analytics
Though there are plenty of analytics services available, it makes sense to choose Google Analytics. It is free, robust and trusted by every digital marketing expert. And its run by Google – who’s also the biggest search Engine out there.
Sign in to your Google Analytics Account
To get Google analytics, sign up for an analytics account if you are a new user, or log into your analytics account if you are an existing user.
Google Analytics has a totally new look from what it used to be.
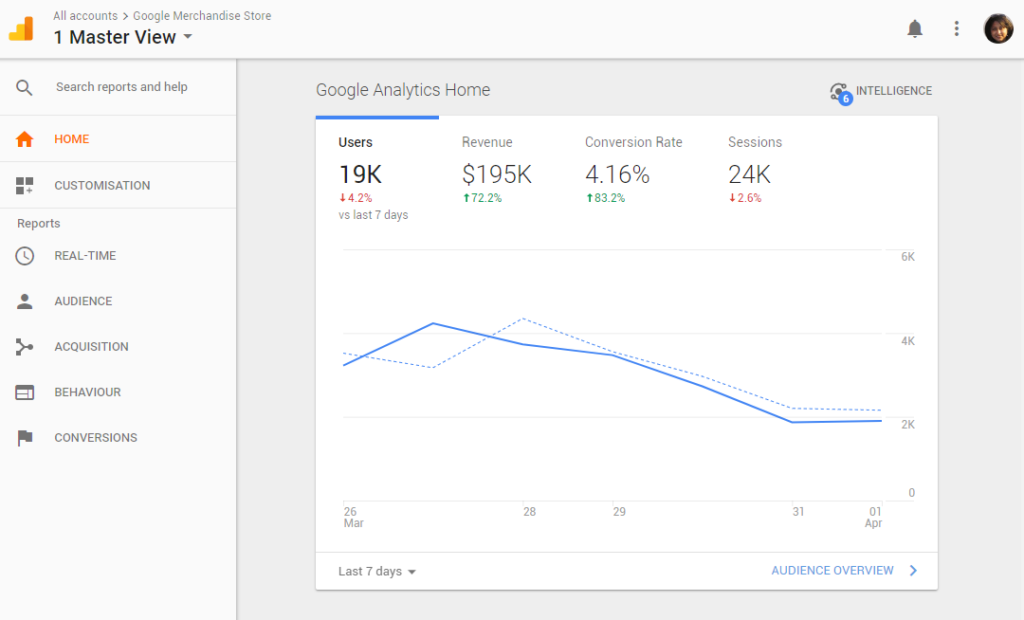
Enter your Account Name, Website URL, Website Name and choose an Industry Category and Reporting and Time Zone.
Then go to Data Sharing Options and choose the options that you want in your reports (you can find a short explanation about each option here)
If you have not already done so, create a property in Google Analytics. Create one Analytics property for each website you want to track. Creating a property generates a tracking ID, which you’ll use in your gtag.js tracking code snippet.
Find your tracking ID, as described below. You’ll use this tracking ID in the tracking code snippet.
Copy and paste the gtag.js tracking code snippet to each web page you want to track. Add the tracking code snippet right after the opening <head> tag on each page. (you can find the instructions right there)
How To find the Tracking ID
Sign in to your Analytics account. Click Admin.
Select an account from the menu in the ACCOUNT column.
Select a property from the menu in the PROPERTY column.
Under PROPERTY, click Tracking Info > Tracking Code. Your tracking ID is displayed at the top of the page.
Paste the following snippet right after the <head> tag on each page of your site. Replace GA_TRACKING_ID with your own Google Analytics tracking ID:
<!– Global Site Tag (gtag.js) – Google Analytics –>
<script async src=”https://www.googletagmanager.com/gtag/js?id=GA_TRACKING_ID”></script>
<script>
window.dataLayer = window.dataLayer || [];
function gtag(){dataLayer.push(arguments);}
gtag(‘js’, new Date());
gtag(‘config’, ‘GA_TRACKING_ID’);
</script>
Verify your Tracking Code
To verify that the tracking code is working, visit your website and check to see that your visit is being registered in the Real-Time reports
Search Console (Earlier Webmasters Tools)
As of May 20, 2015, Google rebranded Google Webmaster Tools as Google Search Console. In January 2018, Google introduced a new version of the Search Console, with a refreshed user interface and improvements.
What is Search Console
Google Search Console is a very useful toolset, a no-charge web service by Google for webmasters that allows you to communicate with Google and adjust many aspects of how Google sees your site, such as list the external and internal links to your site, adjust the crawl rate at which Google bot indexes your site, check the keywords users typed to land on your site, as well as the click through rate for each keyword, see your site’s statistics, and many more.
Google Search Console is the preferred analytic package for a lot of SEO professionals, and rightly so. This is a great set of SEO tools that gives in-depth tracking of different statistics of a website, both from the point of view of the Search Engine spiders as well of human viewers. Google Search Console sums up the website’s key stats in a compact and easy-to-understand and use format.
Why submit to Search Console
Search Console has tools that lets webmasters:
- Submit and check a sitemap and also helps the webmasters to check if there are any errors with their sitemap.
- Check and set the crawl rate, and view statistics about when Googlebot accesses a particular site.
- Write and check a robots.txt file to help discover pages that are blocked in robots.txt accidentally.
- List internal and external pages that link to the site.
- Get a list of links which Googlebot had difficulty crawling, including the error that Googlebot received when accessing the URLs in question.
- See what keyword searches on Google led to the site being listed in the SERPs, and the click through rates of such listings. (Previously named ‘Search Queries’; rebranded May 20, 2015 to ‘Search Analytics’ with extended filter possibilities for devices, search types and date periods)
- Set a preferred domain (e.g. prefer example.com over www.example.com or vice versa), which determines how the site URL is displayed in SERPs.
- Highlight to Google Search elements of structured data which are used to enrich search hit entries (released in December 2012 as Google Data Highlighter
- Demote Sitelinks for certain search results.
- Receive notifications from Google for manual penalties.
- Provide access to an API to add, change and delete listings and list crawl errors.
- Rich Cards a new section added, for better mobile user experience.
- Check the security issues if there are any with the website. (Hacked Site or Malware Attacks)
- Add or remove the property owners and associates of the web property.
Login at https://www.google.com/webmasters/ to start using Google Webmaster Tools. After you join, you need to prove to Google that you are the legit owner of the site you want to use Google Webmaster Tools on through a verification process.
There are several ways to verify ownership. One way to do it is to download an HTML file and to upload it to the root directory of your site. Another way is to add an HTML tag into the head of your home page.
If you are using the same Google account for Google Analytics, a third option to verify ownership is through Google Analytics. If you use Google Webmaster Tools together with Google Analytics, you can access your Google Webmaster Tools data directly from Google Analytics.
Be Ready Before You Submit
Before you submit your site to webmasters, make sure that you have
- Configured your theme
- Added the plugins or extensions correctly
- Created the basic pages like
- About
- Contact
- Terms of Service
- Other Legal disclaimers
Where to Submit
Here are the links to submit your website:
For Google – https://www.google.com/webmasters/tools/submit-url
For Bing and Yahoo – https://www.bing.com/toolbox/submit-site-url

Fixing the Crawl Errors
Crawl errors should be fixed immediately after you submit a website to a search engine. You might be wondering what are crawl errors? Let me explain.
A search engine bot visits or crawls on your website and index the content. There are some factors like no index meta tags, robots.txt file or .htaccess file may block the bots from indexing.
<meta name=“robots” content=“noindex”> – This meta tag may be used by your web developer or by you to prevent robots from indexing the site while it was under construction. When the site is ready for indexing you must remove these tags.
WordPress users: You have to uncheck the prevent search engines to index the site as shown here.
Robots.txt is a text file which should be present in the root or main folder of your website. It directs the search engine bots on what to index and what should not be.
You may have some members only content like some PDF documents or videos; they should not be indexed by these bots. So you can disallow the robots to visit such folders and files.
User-agent : *
Disallow: /
You can review whether your robots.txt file is correct by using official Google tool here
Most of the content management systems allow you to create sitemap.xml by default. Try visiting your website’s site map by your-domain.com/sitemap.xml. Sitemaps help the robots to crawl entire website.
Check for crawl errors again and fix them if any.
In case if you can’t fix them by yourself drop me a message. Let us fix it together!
Quality Link building
There are about 200 ranking factors that determine your SEO. But link building is still one of the important SEO factors.
Many had a wrong conception about link building.
It is not about submitting to directories alone.

This section explains link building in detail.
Inbound linking
Once you have corner stone content and supporting articles you might have tons of internal links.
The links that are linking to a page within your website are called internal links.
Uses of inbound links
- Helps in site navigation
- Increases users session time
- Helps the robots to index more pages
Pro tip: You should link to the keywords to other pages of your site. If you can’t find keywords or adding a link in a meaningful sentence within the content, try this technique.
Add related reading and recommended reading in between the paragraphs.
For example,
Related: How to link my corner stone content?
Recommended: Inbound linking – The ultimate guide for absolute beginners
Backlinks
When a website adds link to your website in their content, they become a traffic source or referrer. You might get more visitors based on the domain authority of the referring website.
If a popular website gives you a backlink, it will drive you more traffic and your SEO ranking will go high.
But a popular site like entrepreneur.com or forbes.com will not highlight your blog or website easily. It needs loads of good articles and valuable information.
If your content is not good, no one will consider giving you a backlink.
Pro tip: Contact the other popular bloggers in your niche and form a network. Ask them for backlinks by exchanging links or some other offer.

Tools
Backlinks cannot be monitored easily, so I recommend using tools like WP Backlink Machine to get backlinks for your website.
You can check the backlinks of your website using ahrefs.com or openlinkprofiler.org

These tools allow you to find the backlinks of your competitor websites too. So if your competitor has an article about 10 ways to increase online sales, you should write an article about 25 ways to maximize online sales.
Then you have to find the backlinks of your competitor’s article
Contact them and ask for a backlink, mention them about how your article is better than your competitors’.
They might offer a backlink which will definitely improve your SEO rankings.
Analyse and improve
Now it’s the time to analyse your SEO performance. There are some concepts you need to understand and improve them over a period of time.
SEO takes time but the results will give your more organic reach and targeted traffic.
In this chapter you will learn how to improve your rankings by using Google analytics reports.
Understanding Google analytics
Google analytics is what a SEO expert will rely on.
Understanding Google analytics is a big deal. There are lot of detailed features that can help you in understanding what your readers do on your website.

You have to understand the basic concepts like bounce rate, unique visitors, referrers, traffic sources etc.
You can read more about Google analytics reports here
Note: Have you noticed that I refer you to searchenginewatch.com’s blog post? Since their content is good I recommend you to read that post.
If you are giving more value to your readers they will give you a backlink and refer you!
Pro tip: If you are a wordpress user you can use Google Analytics Dashboard for WP (GADWP) which simplifies and shows the summary of various reports.
Reducing the bounce rate
The rate at which your visitor goes off from your website (bouncing back) it is called as bounce rate.

If your bounce rate is high it means:
- Poor content
- Bad user experience
- Irrelevant content
- Slow loading
- Content needs formatting
- Not compatible in the visitors’ device to read
You can use a tool like Page Speed Checker Tool to get your page speed and optimize it. Remember most of your visitors use mobile phones to browse the internet, so your website should be optimized for mobile experience.
Finding the searched terms
In your Google analytics reports you can find the searched terms. They are the exact keywords that people search on the internet and landed on your website.
Compare whether those are used by you or they are just related keywords.

If they are new related keywords then add them in your content, this will help you optimize the content according to readers’ search terms.
For example,
Your keyword is “grow instagram followers” and your readers’ is “increase my followers count on instagram” – You can go ahead and add a sentence in your content.
Referrers and traffic sources
By this time you might understand more about referrers. A website that refers their visitors to your site is called referrer.
Traffic sources – are defined us direct, search engines, referral and other traffic sources.

Here you can find traffic generated by social media, email marketing, ad campaigns etc.
UTM query parameters will help you set source and medium for your ad campaigns. Then you can find how they worked in the Google analytics report.
Let us say you have posted special offers on your website sidebar and header with UTM medium – website banners. You can set the source as header banner and sidebar banner respectively.
You can see how many people clicked header ad banner and how many clicked sidebar ad by using traffic sources.
How cool isn’t it?
Imagine a hoarding on a busy street. May be thousands of people look at it every day, but we can’t track how many of them actually visited the website or bought something.
But digital marketing is reliable and you can track your every penny that spent.
Updating the content
Google analytics allows you to find the most visited pages during a period of time.
So if you find some articles are getting traffic and others are not, then you need to edit and update them. Add more points, images and videos – make them interesting to your audience. If a blog post receives more traffic you can link the other posts that are not getting enough traffic.
Like I said earlier you can add the links as “recommended” or “related”

Action Plan
If you’ve come this far, well that’s really great! I hope you got some insights into some basic DIY SEO techniques.
As the next step, I want you to try these techniques on your own website.
- Do keyword research
- Do competitor analysis
- Create a content calendar
- Write regularly
There is no shortcut. Try, analyse, rinse and repeat.
July 2018 Update
If you are really serious about improving your SEO rankings – Check out the recommendations below.
Recommendation 1 – WP Tag Machine 2.0
My favourite choice – 1-CLICK SEO Plugin for WordPress that boosts Your SEO Rankings in Google – Read the full review here »
This is a great plugin that does something very simple & powerful… It allows you to boost your traffic with the help of auto-generated WordPress tags.
Over 35,000 sites are already using this for automatic SEO. WHY DON’T YOU?
Here is all you can do with this plugin…
[+] Add Unlimited Tags to Unlimited Posts
[+] 100% AUTOPILOT SEO Tagging for all your new posts
[+] Add SEO Tags to Images, Pages & Products automatically.
[+] Find Unlimited Tags from the #1 traffic source – Google.
[+] Get long tail tags that help you rank higher.
[+] Add Multiple Tags to Your Post in 1-CLICK
[+] Use Tag Machine for keyword research.
[+] Use Multiple Keywords to find Tags for your posts.
[+] Download Tags into a CSV or TXT file in 1-CLICK.
[+] Unlimited Tag Searches for Your Site.
[+] Use the plugin on Unlimited WordPress Sites.
Just Imagine
[+] Getting 100s of posts ranked in Google for the right keywords.
[+] Having effortless SEO
[+] Having more traffic every single day for your site.
That is now ALL possible with WP Tag Machine 2.0.
Don’t miss out on the Pro version if you want to double your results
[+] All the Features of the Front End Version PLUS…
[+] Find Tags from not ONE but 4 Different Sources
[+] One Click to add Tags to all your OLD Posts.
[+] Automatically Add Tags by Category
[+] Automatically add Tags by Keyword
[+] Bulk Add Tags to Selected Posts
[+] Add Tags in Multiple Languages.
[+] Find Tags from Google Maps/Google Local
[+] Find Tags from Bing, Amazon and Youtube.
[+] Perfect for Video sites and blogs to find relevant Tags.
[+] Perfect for Amazon Affiliate Sites and Review Sites.
[+] GEO-Targeted Tags – find from Google.co.uk or any other Google local site, just select your option & go.
[+] Optionally, Add Tags to Your Content Area in 1-Click.
With WP Tag Machine 2, there is no manual work involved. It is the easiest traffic booster that you can have on your sites. Download it today with my 30 Bonuses and add WP Tag Machine 2.0 to all your WP sites.
Recommendation 2 – SEO Toolkit
How about Getting All the SEO tools in one place?
Now that you have seen some basic SEO stuff that you can do yourself why not get all 60+ SEO tools in one place? Click here to get all these below shown tools

Read the full review here »


